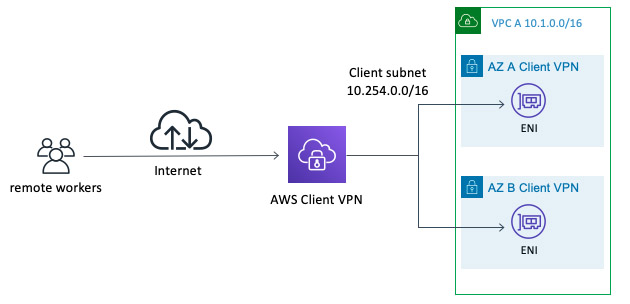
In this article we’ll provision an AWS Client VPN, mimicking a typical scenario used when accessing corporate networks securely. All done in a single step without having to access the AWS Console, or manually generating/copying certificates.
You can find the code in the GitHub repository.
Getting started
We can first clone the repo:
git clone git@github.com:tbalza/aws-vpn.git && \
cd aws-vpn
And with AWS CLI and Terraform installed run:
terraform init && \
terraform apply
After around 10 minutes the VPN Endpoint will be configured and operational:

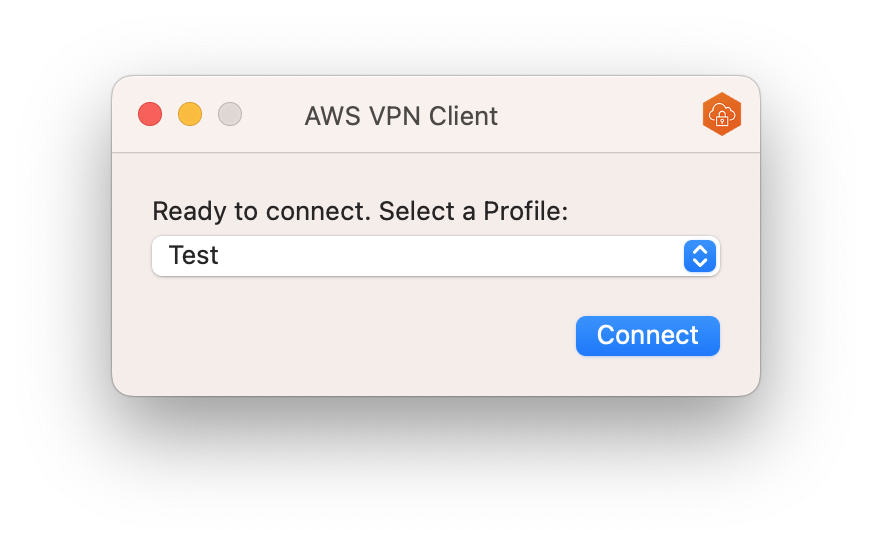
Terraform will generate a client-configuration.ovpn file in the project directory, which contains the complete authentication config.
With AWS VPN Client installed we can then go to File > Manage Properties, create a profile, and select that file to connect to our newly created VPN endpoint.
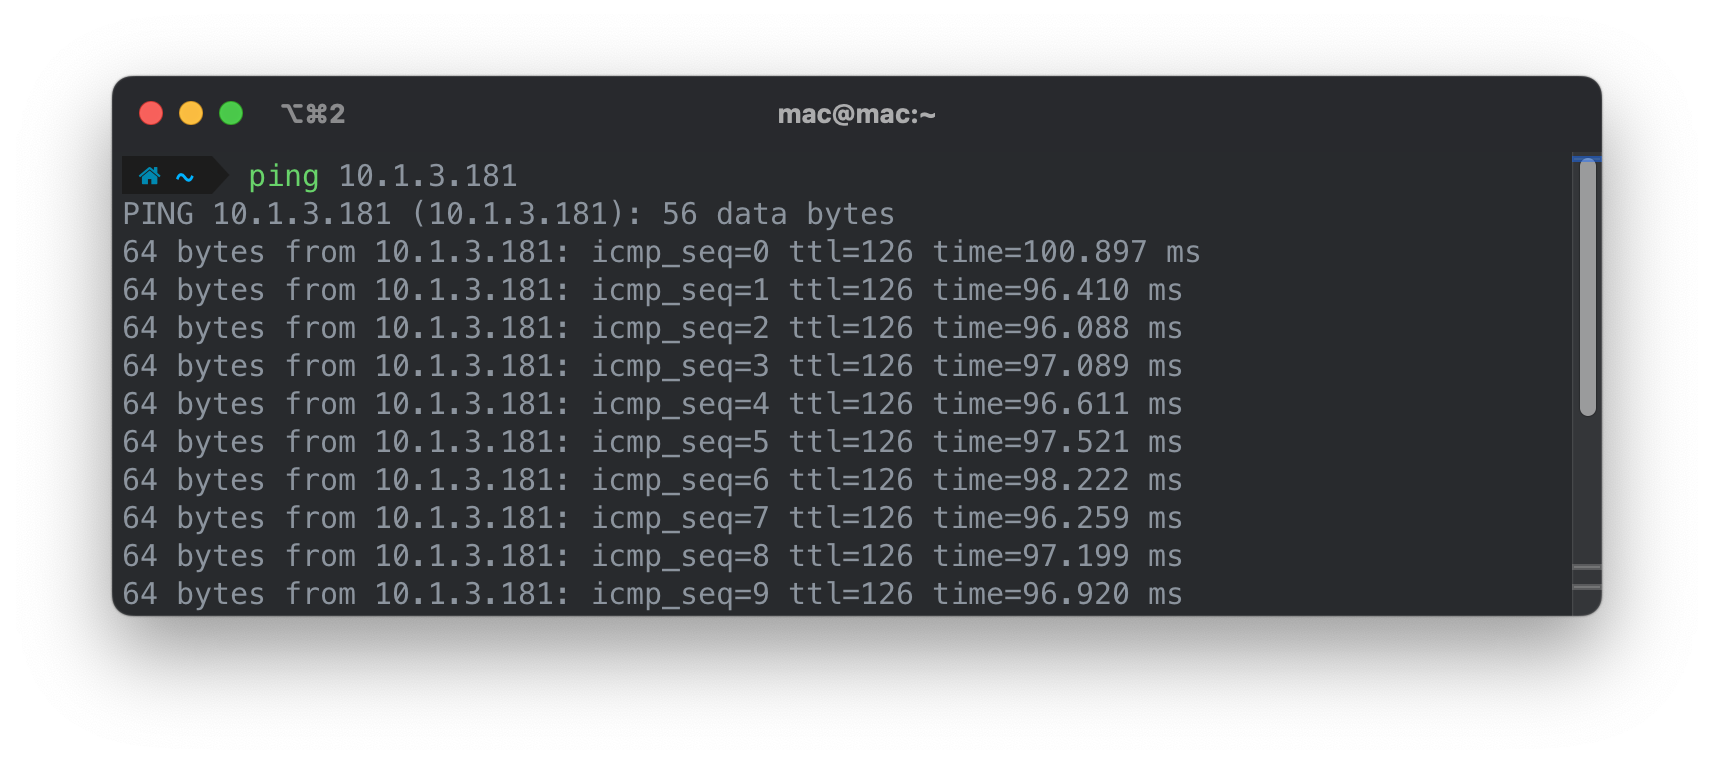
Done! Once connected we’ll be able to access our private subnets securely. Since the VPN Endpoint is configured with a split-tunnel, only traffic related to AWS will be forwarded, improving performance and avoiding unnecessary costs.
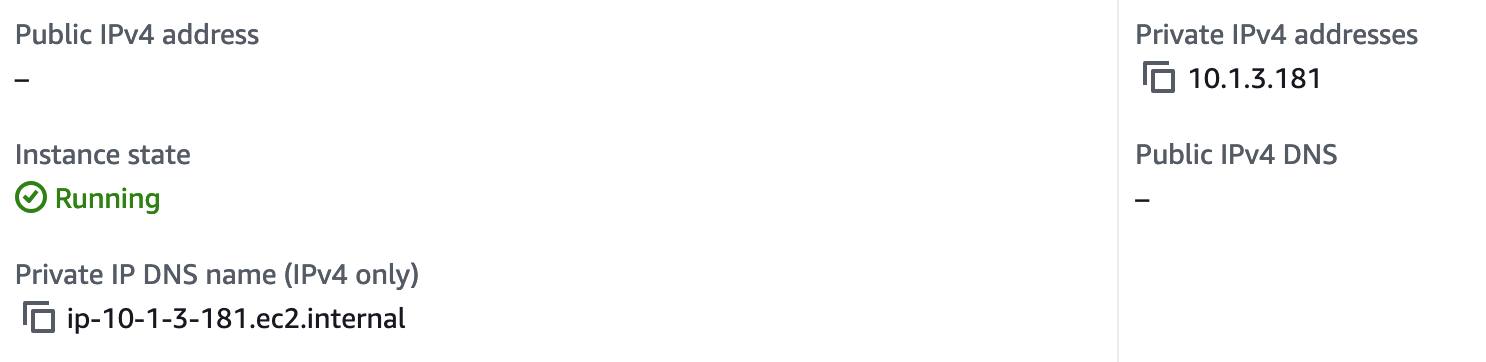
Resources without a public IP are now reachable from our local machine.
Now that we’ve successfully connected, let’s take a look under the hood to see how Terraform is configured.
VPC
module "vpc" {
  source  = "terraform-aws-modules/vpc/aws"
  version = "5.16.0"

  name = "VPC"
  cidr = "10.1.0.0/16"

  azs             = ["us-east-1a", "us-east-1b"]
  private_subnets = ["10.1.1.0/24", "10.1.3.0/24"]
}
Leveraging the terraform-aws-vpc module we can quickly configure our VPC with private subnets and corresponding route tables.
VPN
VPN Endpoint
locals {
  client_cidr = "192.168.68.0/22"
}

resource "aws_ec2_client_vpn_endpoint" "cvpn" {
  description            = "Client VPN Endpoint"
  server_certificate_arn = aws_acm_certificate.server_cert.arn
  client_cidr_block      = local.client_cidr # check
  split_tunnel           = "true"
  security_group_ids     = [module.cvpn_access_security_group.security_group_id]
  vpc_id                 = module.vpc.vpc_id
  self_service_portal    = "disabled"

  authentication_options {
    type                       = "certificate-authentication"
    root_certificate_chain_arn = aws_acm_certificate.server_cert.arn
  }

  connection_log_options {
    enabled = false
  }
}
Here we create the VPN Endpoint with split-tunnel and “Mutual Authentication” which uses certificates for access control. Making the use of ACM we can streamline the setup for this scenario. The client cidr argument refers to the IP range connected remote workers will have, which is separate from the subnet range.
VPN/VPC Association
resource "aws_ec2_client_vpn_authorization_rule" "authorize_cvpn_vpc" {
  client_vpn_endpoint_id = aws_ec2_client_vpn_endpoint.cvpn.id
  target_network_cidr    = module.vpc.vpc_cidr_block # check
  authorize_all_groups   = true
}
After the endpoint gets created, it needs to be associated with the VPC. This can take around 10 minutes to complete.
Subnet Association
resource "aws_ec2_client_vpn_network_association" "associate_subnet" {
  for_each               = {for idx, subnet in module.vpc.private_subnets : idx => subnet} # converts list to map
  client_vpn_endpoint_id = aws_ec2_client_vpn_endpoint.cvpn.id
  subnet_id              = each.value
}
Additionally, subnets also have to be associated. Here, we go through the VPC module’s list recursively and convert them to a map to uniquely identify entries.
Security Group
module "cvpn_access_security_group" {
  source  = "terraform-aws-modules/security-group/aws"
  version = "5.2.0"

  name        = "cvpn_access_security_group"
  description = "Security group for CVPN Access"

  vpc_id = module.vpc.vpc_id

  computed_ingress_with_cidr_blocks = [
    {
      description = "VPN TLS"
      from_port   = 443
      to_port     = 443
      protocol    = "udp"
      cidr_blocks = "0.0.0.0/0"
    }
  ]
  number_of_computed_ingress_with_cidr_blocks = 1

  egress_with_cidr_blocks = [
    {
      description = "All"
      from_port   = -1
      to_port     = -1
      protocol    = -1
      cidr_blocks = "0.0.0.0/0"
    }
  ]
}
As with most resources in AWS, the VPN will not be accessible by default. This security group allows clients/users secure access from the internet.
Certificates
CA
# Creates CA private key
resource "tls_private_key" "ca_key" {
  algorithm = "RSA"
  rsa_bits  = 2048
}

# Creates a self-signed CA TLS certificate in PEM format
resource "tls_self_signed_cert" "ca_cert" {
  private_key_pem = tls_private_key.ca_key.private_key_pem

  subject {
    common_name = "ca.${var.domain_name}"
  }

  is_ca_certificate     = true # can be used to sign other certificates and control certificate revocation lists
  validity_period_hours = 87600
  allowed_uses = [
    "cert_signing",
    "crl_signing",
  ]
}
Leveraging ACM and using the tls provider we can use self-signed certificates, simplifying the process as we’ll assume we don’t need a custom Certificate Authority in this example. This provider replaces the use of easyrsa and makes our configuration self-contained and dynamic.
Server
# Creates server private key
resource "tls_private_key" "server_key" {
  algorithm = "RSA"
  rsa_bits  = 2048
}

# Generates server CSR used to request cert from CA
resource "tls_cert_request" "server_req" {
  private_key_pem = tls_private_key.server_key.private_key_pem

  subject {
    common_name = "vpn.${var.domain_name}"
  }
}

# Creates server certificate signed by a CA
resource "tls_locally_signed_cert" "server_cert" {
  cert_request_pem   = tls_cert_request.server_req.cert_request_pem
  ca_private_key_pem = tls_private_key.ca_key.private_key_pem
  ca_cert_pem        = tls_self_signed_cert.ca_cert.cert_pem

  validity_period_hours = 87600
  allowed_uses = [
    "key_encipherment",
    "digital_signature",
    "server_auth",
  ]
}

# Uploads server certificate to ACM (used by AWS Client VPN)
resource "aws_acm_certificate" "server_cert" {
  private_key       = tls_private_key.server_key.private_key_pem
  certificate_body  = tls_locally_signed_cert.server_cert.cert_pem
  certificate_chain = tls_self_signed_cert.ca_cert.cert_pem
}
Here we create the self-signed server certificate and upload it to ACM.
Client
# Creates client private key
resource "tls_private_key" "client_key" {
  algorithm = "RSA"
  rsa_bits  = 2048
}

# Generates client CSR used to request cert from CA
resource "tls_cert_request" "client_req" {
  private_key_pem = tls_private_key.client_key.private_key_pem

  subject {
    common_name = "client.${var.domain_name}"
  }
}

# Creates client certificate signed by a CA
resource "tls_locally_signed_cert" "client_cert" {
  cert_request_pem   = tls_cert_request.client_req.cert_request_pem
  ca_private_key_pem = tls_private_key.ca_key.private_key_pem
  ca_cert_pem        = tls_self_signed_cert.ca_cert.cert_pem

  validity_period_hours = 87600
  allowed_uses = [
    "client_auth"
  ]
}
Finally, we create the client certificate, which is needed to complete the Client VPN endpoint configuration file used for authentication.
Client Configuration
resource "null_resource" "download_cvpn_config" {
  depends_on = [aws_ec2_client_vpn_endpoint.cvpn]

  provisioner "local-exec" {
    command     = <<EOF
      #!/bin/bash
      set -e  # Exit on error

      # Export the VPN configuration
      aws ec2 export-client-vpn-client-configuration --client-vpn-endpoint-id ${aws_ec2_client_vpn_endpoint.cvpn.id} --output text > ./client-config.ovpn

      # Embed the client certificate
      echo '<cert>' >> ./client-config.ovpn
      echo "${tls_locally_signed_cert.client_cert.cert_pem}" >> ./client-config.ovpn
      echo '</cert>' >> ./client-config.ovpn

      # Embed the private key
      echo '<key>' >> ./client-config.ovpn
      echo "${tls_private_key.client_key.private_key_pem}" >> ./client-config.ovpn
      echo '</key>' >> ./client-config.ovpn
    EOF
    interpreter = ["/bin/bash", "-c"]
  }

  triggers = {
    always_run = "${timestamp()}"
  }
}
This last code block uses the local-exec provisioner to automatically prepare the Client VPN endpoint configuration file without having to manually download it via the AWS Console and adding the client certification data.
Conclusions
We’ve reviewed a Terraform configuration that simplifies the AWS Client VPN deployment. This setup demonstrates a workflow in the spirit of best practices, reducing overhead and human error by declaratively defining our infrastructure.