This guide outlines the steps to launch a highly available WordPress application, structured as a four-tier architecture, using ECS for container orchestration.
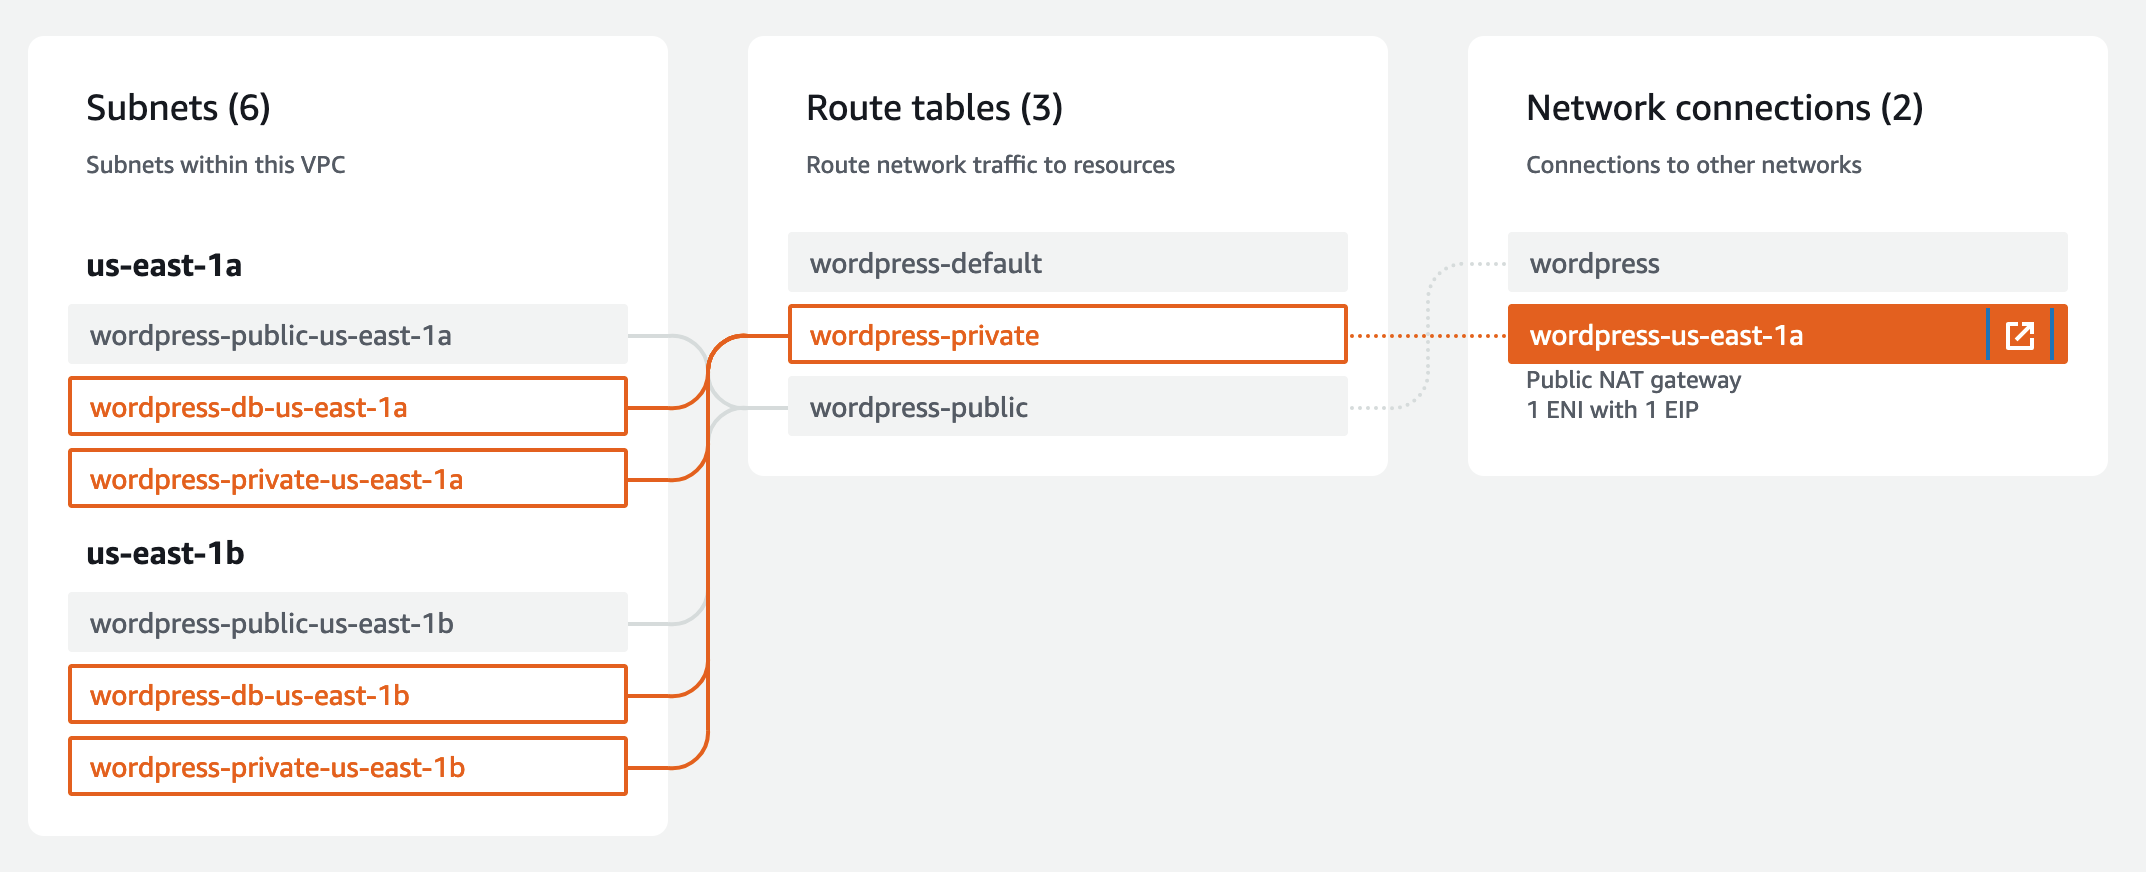
Our final infrastructure will look like this,

Find the complete setup on instructions in the GitHub repository.
WordPress
WordPress is a widely used CMS powering a significant portion of the internet’s websites.
WordPress rose to popularity quickly because of its up-to-date development framework, extensive feature set, flexibility, rapid and multilingual publishing ability, multi-author support, and thriving community. Thousands of free and commercial themes and plugins are available to extend and personalize WordPress for just about every situation. (From bitnami.com)
Even though WordPress operates as a monolithic application, by leveraging Docker, AWS RDS, and EFS, we can transform it into a stateless architecture. This decouples the computing layer from the rest of the infrastructure, enhancing flexibility. Specifically, it allows us to run multiple servers behind load balancers, thereby achieving high availability.
In this setup, Docker containers play a crucial role by encapsulating the WordPress application, making it portable and consistent across different computing environments. This ties into the broader architectural tiers by ensuring the application layer is both scalable and resilient.
Furthermore, the separation of storage (via EFS) and database services (using RDS) enables more robust and isolated backups, as well as seamless rolling updates. This approach ensures that ongoing user sessions remain unaffected, eliminating downtime during updates.
Adopting Modern Development Practices
In our projects, we prioritize technologies that embrace modern development methodologies, including Continuous Integration/Continuous Deployment (CI/CD) and Infrastructure as Code (IaC). We advocate for the following practices:
- Automated deployment and provisioning of all infrastructure components.
- Seamless rolling updates for services, ensuring zero downtime.
- Version-controlled infrastructure changes, treat your infrastructure setup as you would with application code.
- Unified codebase catering to multiple environments like development and production.
- Comprehensive monitoring capabilities for crucial components and resources, utilizing metrics for performance insights.
Automation Focus
This guide focuses on declarative provisioning and deployment.
Please note, while AWS resources will incur costs, our Terraform-guided process simplifies the removal of all resources with the terraform destroy command to prevent unnecessary expenses.
Container Orchestration with ECS on EC2
ECS on EC2 provides a versatile environment for running Docker containerized services, supporting applications of any scale or type. Our setup involves managing EC2 instances, ensuring service internet accessibility and high availability by deploying across multiple Availability Zones with dynamic scaling through an Autoscaling Policy.
ECS EC2 versus Fargate
While Fargate offers a serverless alternative, eliminating infrastructure management, it may lead to higher costs with extensive memory usage. ECS on EC2, conversely, grants more flexibility in instance types and running specific tasks like daemon agents. The choice between ECS on EC2 and Fargate hinges on your team’s expertise, infrastructure management capabilities, and specific needs such as running specialized software.
Key Components of Our Setup
- WordPress: This is the CMS platform we’ll be deploying in our environment.
- Elastic Container Service (ECS): Utilizes clusters, services, and tasks for service operation.
- Elastic File System (EFS): Ensures persistent application data.
- Relational Database Service (RDS): Manages database operations.
- Secrets Manager: Secures sensitive information like passwords.
- Certificate Manager: Manages SSL certificates, with domain DNS handled externally by CloudFlare.
- Application Load Balancer (ALB): Directs requests to various container instances.
- Autoscaling Group (ASG): Provides EC2 instance scaling and high availability.
- Security Groups: Implements firewall rules for EC2 instances and ALBs.
- Virtual Private Cloud (VPC): Encapsulates subnets and internet gateways, distinguishing between public subnets for the ALB and private subnets for ECS services.
Permissions Requirements
In cloud environments like AWS, permissions and roles serve as foundational elements in securing and defining what resources and actions various entities (like services, users, or applications) are allowed or denied. Here’s a high-level explanation in relation to the setup:
- Security Groups: Act as virtual firewalls that control the traffic allowed to and from ECS containers, ensuring only authorized network requests (like those from an ALB) are permitted.
- ECS Task Role: Assigns specific permissions to ECS tasks, enabling them to interact with other AWS services like S3 for storage, CloudWatch for logging, or EFS for file systems without embedding sensitive credentials within the containers.
- Trust Relationship Policy: Establishes a trust where ECS tasks are permitted to assume a role, enabling actions like pulling images or managing resources based on the defined permissions (like AmazonECSTaskExecutionRolePolicy).
- EC2 Role: Similar to the ECS Task Role, it assigns permissions to the EC2 instances within the cluster to interact with AWS services necessary for their operation, like EFS or the EC2 Container Service itself.
- Listeners and Target Group: Direct traffic from the ALB to the appropriate backend services based on the request, enabling secure and efficient traffic management.
A heads-up: Grasping the following details requires a thorough understanding of each AWS service and the complex ways in which different permission levels interweave. Below is a service-by-service breakdown, detailing the necessary configurations to facilitate communication between individual services.
1. Amazon Elastic Container Service (ECS):
- ECS Security Group (Inbound): Allow traffic from the Application Load Balancer (ALB).
- ECS Security Group (Outbound): Allow traffic to Amazon RDS, ECS, and the internet.
- ECS Task Role: Allows ECS tasks to interact with specific AWS services.
AmazonECSTaskExecutionRolePolicy: Allows ECS tasks to make API requests to ECS.AmazonS3FullAccess: Required if the setup needs S3 access for backups or media storage.CloudWatchLogsFullAccess: Allows tasks to send logs to Amazon CloudWatch.AmazonElasticFileSystemClientFullAccess: Grants access to EFS.- Trust Relationship Policy: Principal:
ecs-tasks.amazonaws.comAction:sts:AssumeRole - ECS Task Execution Role: Used by: ECS agent and Docker daemon to pull images and manage resources.
AmazonECSTaskExecutionRolePolicy- Trust Relationship Policy: Principal:
ecs-tasks.amazonaws.comAction:sts:AssumeRole
2. Amazon EC2 Instance (from EC2 cluster):
- EC2 Role (defined in ASG module):
AmazonEC2ContainerServiceforEC2RoleAmazonSSMManagedInstanceCoreAmazonElasticFileSystemClientFullAccess- EC2 Security Group (defined in ASG module): Inbound: Allow traffic on ports
80,3306, and2049from VPC private subnets.
3. Amazon RDS:
- Security Group: Inbound: Allow traffic from the ECS Security Group on MySQL port
3306.
4. Application Load Balancer (ALB):
- Security Group: Inbound: Allow traffic on ports
80(HTTP) and443(HTTPS). Outbound: Allow rules to communicate with VPC CIDR block. - Listeners: HTTP
80: Redirect to HTTPS443. HTTPS443: Forward to the ECS target group. - Target Group: Backend protocol: HTTP. Backend port:
8080
5. Auto Scaling Group (ASG):
- Security Group: Use the EC2 security group.
- Policies Required for Associated Roles:
AmazonEC2AutoScalingFullAccess
6. Amazon Elastic File System (EFS):
- Security Groups: Inbound: Allow traffic on port
2049from VPC private subnets. - Mount Targets: Create in each Availability Zone used by ECS instances or tasks.
Overall, permissions and roles are essential in this setup for ensuring that each component operates securely, interacts properly with other services, and has access to only the resources necessary for its function, following the principle of least privilege.
Terraform Registry Modules
This configuration utilizes modules to enhance the efficiency and organization of infrastructure provisioning.
A module, a superior construct within Terraform, consolidates multiple resources into a single, reusable package. Available from sources such as the Terraform Registry, these modules embody best practices and facilitate consistent application across various projects. They are crafted from resources—the elemental components of Terraform like compute instances or databases—which are the foundational elements for sculpting the anticipated state of infrastructure.
Advantages of Utilizing Modules:
- Simplification: Consolidates various resources and methodologies into a unified entity.
- Standardization: Ensures uniform creation of resources.
- Versioning: Facilitates seamless updates and straightforward rollbacks.
- Community-Tested: Guarantees dependability through extensive community review.
- Maintenance: Streamlines the update and maintenance processes.
- Documentation: Offers comprehensive instructions and examples.
While modules cater to a broad range of needs, direct use of provider resources is warranted for highly customized scenarios or specific requirements not addressed by existing modules. Nonetheless, a hybrid approach, combining modules with direct resource utilization, can often provide the most comprehensive solution, filling in any gaps to achieve the desired infrastructure configuration.
In essence, modules render Terraform configurations more streamlined and standardized, striking an optimal balance between ease of use and the ability to tailor to specific needs.
VPC
module "vpc" {
  source  = "terraform-aws-modules/vpc/aws"
  version = "~> 5.0"

  name = local.name
  cidr = local.vpc_cidr

  azs              = local.azs
  public_subnets   = [for k, v in local.azs : cidrsubnet(local.vpc_cidr, 8, k)]
  private_subnets  = [for k, v in local.azs : cidrsubnet(local.vpc_cidr, 8, k + 3)]
  database_subnets = [for k, v in local.azs : cidrsubnet(local.vpc_cidr, 8, k + 6)]

  create_database_subnet_group = true

  enable_nat_gateway = true
  single_nat_gateway = true
}

output "alb" {
  value = module.alb.dns_name
}
This module efficiently establishes a secure, highly available AWS VPC with structured network segmentation (public, private, database subnets) enhancing resilience across multiple zones. Public subnets connect directly to the internet via an Internet Gateway. Private and database subnets, routed for internal traffic, use a NAT Gateway, enabling internet access without external exposure.
ECS Cluster
module "ecs_cluster" {
  source  = "terraform-aws-modules/ecs/aws//modules/cluster"
  version = "~> 5.10"

  cluster_name = local.name

  cloudwatch_log_group_retention_in_days = 1

  # Capacity provider - autoscaling groups
  default_capacity_provider_use_fargate = false
  autoscaling_capacity_providers = {
    # On-demand instances
    ex_1 = {
      auto_scaling_group_arn         = module.autoscaling["ex_1"].autoscaling_group_arn
      managed_termination_protection = "DISABLED"

      managed_scaling = { # Enabling would allow for autoscaling instances
        maximum_scaling_step_size = 1
        minimum_scaling_step_size = 1
        status                    = "DISABLED"
        target_capacity           = 100
      }

      default_capacity_provider_strategy = { # This would be edited for multiple capacity providers
        weight = 60
        base   = 20
      }
    }
  }
}
Since we are not yet using auto-scaling, this module only defines the cluster name and the capacity provider, that will be used later on by the service. (The provider strategy is a placeholder for later implementation)
ECS Service
module "ecs_service" {
  source  = "terraform-aws-modules/ecs/aws//modules/service"
  version = "~> 5.10"

  # Service
  name        = local.name
  cluster_arn = module.ecs_cluster.arn
  cpu         = 1843 # CPU units for the task, reserving some for system overhead (t3.micro)
  memory      = 724  # Memory for the task, reserving system overhead (t3.micro)

  # Task Definition (The Task IAM role is defined in the Autoscaling module)
  requires_compatibilities = ["EC2"]
  capacity_provider_strategy = {
    # On-demand instances
    ex_1 = {
      capacity_provider = module.ecs_cluster.autoscaling_capacity_providers["ex_1"].name
      weight            = 1
      base              = 1
    }
  }

  # EFS volume
  volume = {
    wordpress_data = {
      efs_volume_configuration = {
        file_system_id     = module.efs.id
        transit_encryption = "ENABLED"
        authorization_config = {
          access_point_id = module.efs.access_points["root"]["id"]
          iam             = "ENABLED"
        }
      }
    }
  }

  load_balancer = {
    service = {
      target_group_arn = module.alb.target_groups["ex_ecs"].arn
      container_name   = local.container_name
      container_port   = local.container_port
    }
  }

  subnet_ids = module.vpc.private_subnets
  security_group_rules = {
    alb_http_ingress = {
      type                     = "ingress"
      from_port                = local.container_port
      to_port                  = local.container_port
      protocol                 = "tcp"
      description              = "Service port"
      source_security_group_id = module.alb.security_group_id
    },
    "allow-internet" = { # to fetch docker image outside AWS (not in ECR)
      type        = "egress"
      protocol    = "all"
      cidr_blocks = ["0.0.0.0/0"]
      from_port   = 0
      to_port     = 0
    }
  }
}
Using a t3.micro instance for testing purposes, here we’re maxing out a single task (minus the aws agent overhead) to occupy the total available computing resources (CPU and memory). Additionally, we define a snippet of the container definition, where we configure the first stage for using an EFS volume for data storage. Furthermore, we connect the ecs task to the load balancer telling it will receive traffic on port 8080.
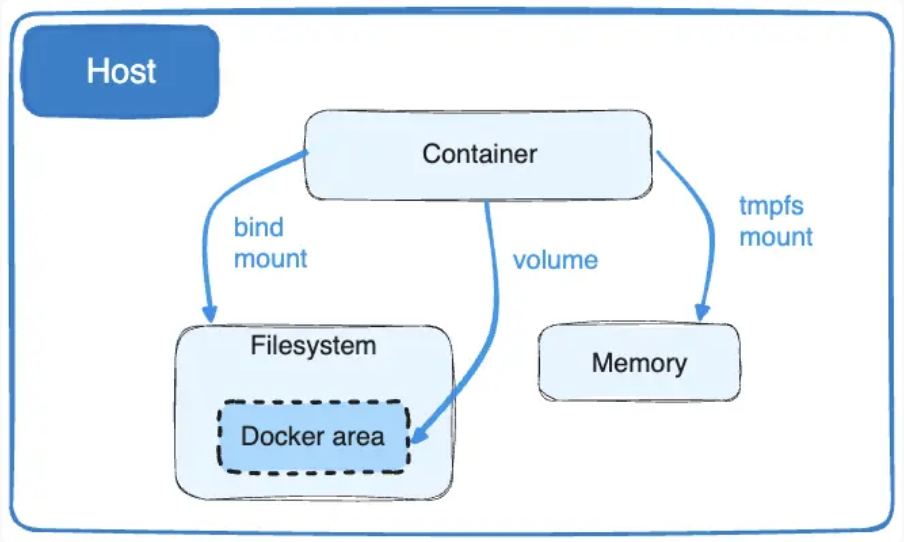
The volume definition allows the docker container to have WordPress data persistence outside the container itself.
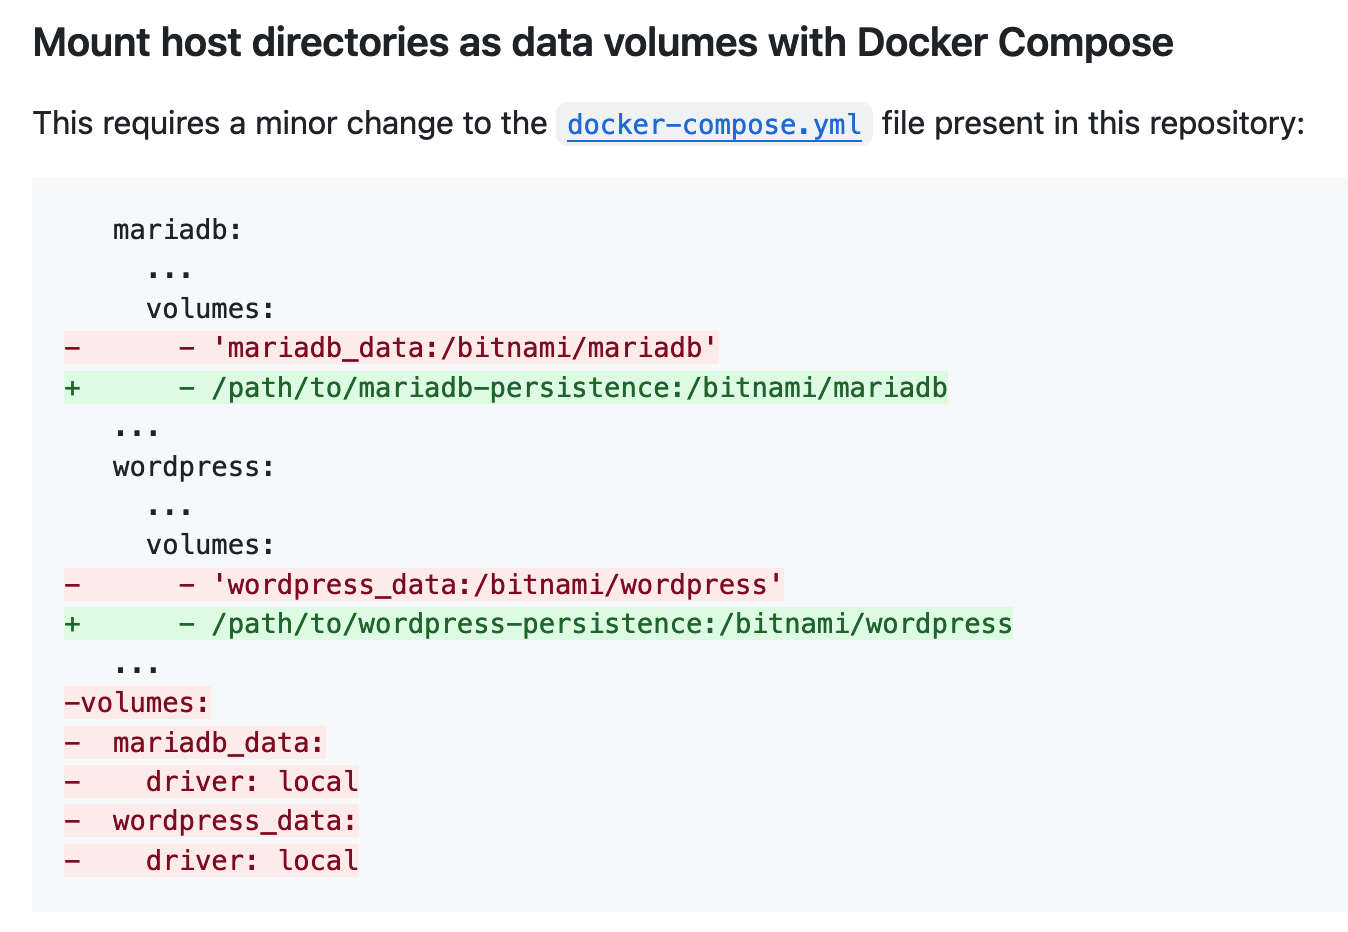
If we were using a docker-compose.yml file this chunk,
 volume = {
    wordpress_data = {
      efs_volume_configuration = {
        file_system_id     = module.efs.id
        transit_encryption = "ENABLED"
        authorization_config = {
          access_point_id = module.efs.access_points["root"]["id"]
          iam             = "ENABLED"
        }
      }
    }
  }
Would be the ECS equivalent of this,
Container Definitions
  # Container definition(s)
  container_definitions = {
    (local.container_name) = {
      image     = "docker.io/bitnami/wordpress:6"
      user      = "root" # Ideally run docker container as non-root user
      essential = true
      port_mappings = [
        {
          name          = local.container_name
          containerPort = local.container_port # Port 8080 is bitnami container default
          hostPort      = local.container_port # ALB listens on port 80, forwards to target group on port 8080
        }
      ]
      cpu    = 1843 # Allocate nearly all CPU units to this container
      memory = 724  # Allocate majority of memory to this container

      environment = [
        {
          name  = "WORDPRESS_DATABASE_HOST"
          value = module.rds.db_instance_address
        },
        {
          name  = "WORDPRESS_DATABASE_PORT_NUMBER"
          value = 3306
        },
        {
          name  = "WORDPRESS_DATABASE_USER"
          value = "wordpress"
        },
        {
          name  = "WORDPRESS_DATABASE_NAME"
          value = "wordpressdb"
        },
        {
          name  = "WORDPRESS_USERNAME"
          value = "wordpress"
        },
        {
          name  = "WORDPRESS_ENABLE_HTTPS"
          value = "yes"
        },
        {
          name  = "WORDPRESS_VOLUME_DIR"
          value = "/mnt/efs/"
        },
      ]

      secrets = [
        {
          name      = "WORDPRESS_DATABASE_PASSWORD"
          valueFrom = module.secret_db_password.secret_arn
        },
        {
          name      = "WORDPRESS_PASSWORD"
          valueFrom = module.secret_user_password.secret_arn
        }
      ]

      mount_points = [
        {
          sourceVolume  = "wordpress_data",
          containerPath = "/bitnami/wordpress" # by default wp-config.php wp-content are persisted, env WORDPRESS_DATA_TO_PERSIST
          readOnly      = false
        }
      ]

      readonly_root_filesystem = false

      enable_cloudwatch_logging              = true
      create_cloudwatch_log_group            = true
      cloudwatch_log_group_name              = "/aws/ecs/${local.name}/${local.container_name}"
      cloudwatch_log_group_retention_in_days = 1

      log_configuration = {
        logDriver = "awslogs"
      }
    }
  }
The current Bitnami image used for deploying an ECS EC2 application offers a ready-to-use, standardized solution that reduces setup time and maintains consistency across different settings.
Conversely, an extensive CI/CD pipeline using Docker provides significantly more customization and control. In this framework, developers can tailor Docker images to specific requirements, update and manage versions through a Version Control System (VCS), and monitor modifications over time.
For our purposes, this image supports customization through environment variables specified in the container definitions.
Additionally, we set the parameters for cloudwatch to log the events related to our task.
ALB
# Extract the last version of AWS Optimized AMI for ECS
data "aws_ssm_parameter" "ecs_optimized_ami" {
  name = "/aws/service/ecs/optimized-ami/amazon-linux-2/recommended"
}

module "alb" {
  source  = "terraform-aws-modules/alb/aws"
  version = "~> 9.0"

  name = local.name

  load_balancer_type = "application"

  vpc_id  = module.vpc.vpc_id
  subnets = module.vpc.public_subnets

  # For example only
  enable_deletion_protection = false

  # Security Group
  security_group_ingress_rules = {
    all_http = {
      from_port   = 80
      to_port     = 80
      ip_protocol = "tcp"
      description = "HTTP web traffic"
      cidr_ipv4   = "0.0.0.0/0"
    }
    all_https = {
      from_port   = 443
      to_port     = 443
      ip_protocol = "tcp"
      description = "HTTPS web traffic"
      cidr_ipv4   = "0.0.0.0/0"
    }

  }
  security_group_egress_rules = {
    all = {
      ip_protocol = "-1"
      cidr_ipv4   = module.vpc.vpc_cidr_block
    }
  }

  listeners = {
    ex-http-https-redirect = {
      port     = 80
      protocol = "HTTP"
      redirect = {
        port        = "443"
        protocol    = "HTTPS"
        status_code = "HTTP_301"
      }
    }
    ex-https = {
      port            = 443
      protocol        = "HTTPS"
      ssl_policy      = "ELBSecurityPolicy-TLS13-1-2-Res-2021-06"
      certificate_arn = module.acm.acm_certificate_arn

      forward = {
        target_group_key = "ex_ecs"
      }
    }
  }

  target_groups = {
    ex_ecs = {
      backend_protocol                  = "HTTP"
      backend_port                      = local.container_port
      target_type                       = "ip"
      deregistration_delay              = 5
      load_balancing_cross_zone_enabled = true

      health_check = {
        enabled             = true
        healthy_threshold   = 5
        interval            = 30
        matcher             = "200"
        path                = "/"
        port                = "traffic-port"
        protocol            = "HTTP"
        timeout             = 5
        unhealthy_threshold = 2
      }

      # Theres nothing to attach here in this definition. Instead,
      # ECS will attach the IPs of the tasks to this target group
      create_attachment = false
    }
  }

  tags = local.tags
}
This block sets up an AWS Application Load Balancer (ALB) redirecting all HTTP traffic to HTTPS, and then all that TLS traffic to our target group that listens on 8080 (forward to ex_ecs). It also sets up health monitoring.

Autoscaling
module "autoscaling" {
  source  = "terraform-aws-modules/autoscaling/aws"
  version = "~> 6.5"

  for_each = {
    # On-demand instances
    ex_1 = {
      instance_type              = "t3.micro"
      use_mixed_instances_policy = false
    }
  }

  name = local.name

  image_id      = jsondecode(data.aws_ssm_parameter.ecs_optimized_ami.value)["image_id"]
  instance_type = "t3.micro"

  instance_market_options = {
    market_type = "spot" # Lower cost for testing purposes
  }

  security_groups                 = [aws_security_group.autoscaling_sg.id]
  user_data                       = base64encode(local.on_demand_user_data)
  ignore_desired_capacity_changes = true

  create_iam_instance_profile = true
  iam_role_name               = local.name
  iam_role_description        = "ECS role for ${local.name}"
  iam_role_policies = {
    AmazonEC2ContainerServiceforEC2Role = "arn:aws:iam::aws:policy/service-role/AmazonEC2ContainerServiceforEC2Role"
    AmazonSSMManagedInstanceCore        = "arn:aws:iam::aws:policy/AmazonSSMManagedInstanceCore"
    EFSFullAccess                       = aws_iam_policy.efs_full_access.arn
    RDSFullAccess                       = aws_iam_policy.rds_full_access.arn
    ecs-secrets-manager-access          = aws_iam_policy.secrets_manager_access.arn
  }

  vpc_zone_identifier = module.vpc.private_subnets
  health_check_type   = "EC2"
  min_size            = 2 # Make task Highly Available maintaining 2 ec2 instances across each AZ
  max_size            = 4 # Allow for temporary creation of extra instances while reaching desired capacity
  desired_capacity    = 2

  # https://github.com/hashicorp/terraform-provider-aws/issues/12582
  autoscaling_group_tags = {
    AmazonECSManaged = true
  }

  # Required for  managed_termination_protection = "ENABLED"
  protect_from_scale_in = false

}
This further links ECS with the load balancer. It defines our Highly Available desired state, where to instances should be always available redundantly in two different AZs.
It sets the required policies to grant permissions to the EC2 instance itself for accessing the ECS container management, SSM for instance configuration (and console access), EFS for file storage access, RDS for database access, and access to the Secrets Manager.
Additionally, it defines that a payload should be run on the provisioned ec2 instances before the container service runs.
Bash Script
  on_demand_user_data = <<-EOT
    #!/bin/bash

    yum install -y amazon-efs-utils
    mkdir -p /mnt/efs
    mount -t efs -o tls,accesspoint=${module.efs.access_points["root"]["id"]} ${module.efs.id}:/ /mnt/efs
    echo '${module.efs.id}:/ /mnt/efs efs tls,accesspoint=${module.efs.access_points["root"]["id"]} 0 0' >> /etc/fstab

    cat <<'EOF' >> /etc/ecs/ecs.config
    ECS_CLUSTER=${local.name}
    ECS_LOGLEVEL=debug
    ECS_CONTAINER_INSTANCE_TAGS=${jsonencode(local.tags)}
    ECS_ENABLE_TASK_IAM_ROLE=true
    EOF
  EOT
Since we’re not on fargate, our ec2 instance needs to know that it belongs to de cluster we defined earlier.
It also needs to install the efs-utils agent, and mount it to /mnt/efs before the container runs, so it can successfully mount the persistent volume defined earlier in the container definitions.
Without this crucial step or instance won’t be ready to connect to the container, and the volume will not mount correctly, and instead create internal volumes on the attached SSD every time it’s instantiated,
Security Groups
# Security Groups for EC2 instances
resource "aws_security_group" "autoscaling_sg" {
  name        = "autoscaling_sg"
  description = "Autoscaling group security group"
  vpc_id      = module.vpc.vpc_id
  tags        = local.tags
}

resource "aws_security_group_rule" "ingress_http_from_alb" { # HTTP
  type                     = "ingress"
  from_port                = 80
  to_port                  = 80
  protocol                 = "tcp"
  security_group_id        = aws_security_group.autoscaling_sg.id
  source_security_group_id = module.alb.security_group_id
}

resource "aws_security_group_rule" "ingress_mysql_from_alb" { # RDS
  type                     = "ingress"
  from_port                = 3306
  to_port                  = 3306
  protocol                 = "tcp"
  security_group_id        = aws_security_group.autoscaling_sg.id
  source_security_group_id = module.alb.security_group_id # Adjust this if the source is not the ALB
}

resource "aws_security_group_rule" "ingress_nfs_from_alb" { # EFS
  type                     = "ingress"
  from_port                = 2049
  to_port                  = 2049
  protocol                 = "tcp"
  security_group_id        = aws_security_group.autoscaling_sg.id
  source_security_group_id = module.alb.security_group_id # Adjust this if the source is not the ALB
}

resource "aws_security_group_rule" "egress_all" {
  type              = "egress"
  from_port         = 0
  to_port           = 0
  protocol          = "-1" # Represents all protocols
  security_group_id = aws_security_group.autoscaling_sg.id
  cidr_blocks       = ["0.0.0.0/0"] # Allows all outbound traffic
}

# Role Policies to add to EC2 Role
resource "aws_iam_policy" "efs_full_access" {
  name        = "EFSFullAccess"
  description = "Provides full access to EFS"

  policy = jsonencode({
    Version = "2012-10-17"
    Statement = [{
      Action   = "elasticfilesystem:*"
      Effect   = "Allow"
      Resource = "*"
    }]
  })
}

# elasticfilesystem:Describe* elasticfilesystem:ClientWrite elasticfilesystem:ClientMount
# "Resource": "${module.efs.arn}"

resource "aws_iam_policy" "rds_full_access" {
  name        = "RDSFullAccess"
  description = "Provides full access to RDS"

  policy = jsonencode({
    Version = "2012-10-17"
    Statement = [{
      Action   = "rds:*"
      Effect   = "Allow"
      Resource = "*"
    }]
  })
}
This is an example of the trade-off between modules and using direct resources. Since the modules don’t directly support connecting RDS and EFS, we can create the necessary security groups for added services to interact.
RDS
module "rds" {
  source  = "terraform-aws-modules/rds/aws"
  version = "~> 6.5.2"

  identifier = "rds"

  engine                = "mysql"
  engine_version        = "8.0"
  family                = "mysql8.0" # DB parameter group
  major_engine_version  = "8.0"      # DB option group
  instance_class        = "db.t4g.micro"
  storage_type          = "gp3"
  allocated_storage     = 20
  max_allocated_storage = 100

  availability_zone = module.vpc.azs[0]

  depends_on = [module.secret_db_password]

  username                            = "wordpress"
  password                            = data.aws_secretsmanager_secret_version.secret_db_password.secret_string # fetch actual password string from secrets manger
  db_name                             = "wordpressdb"
  port                                = 3306
  manage_master_user_password         = false
  iam_database_authentication_enabled = false

  skip_final_snapshot    = true
  create_db_option_group = false

  db_subnet_group_name   = module.vpc.database_subnet_group
  vpc_security_group_ids = [module.security_group.security_group_id]
}

module "security_group" {
  source  = "terraform-aws-modules/security-group/aws"
  version = "~> 5.0"

  name        = local.name
  description = "EC2 docker access to RDS"
  vpc_id      = module.vpc.vpc_id


  ingress_with_cidr_blocks = [
    { # RDS Ingress
      from_port   = 3306
      to_port     = 3306
      protocol    = "tcp"
      description = "MySQL access from within VPC"
      cidr_blocks = module.vpc.vpc_cidr_block
    },
  ]

  tags = local.tags
}
Here we simply create the rds instance, and set the password to be retrieved from the secrets manager later on. The depends_on definition makes sure the module has generated the password before it’s executed. This usually isn’t required because TF can figure out execution order dependencies, but in this case it is warranted.
EFS
module "efs" {
  source  = "terraform-aws-modules/efs/aws"
  version = "~> 1.6.1"

  # File system
  name           = local.name
  creation_token = local.name
  encrypted      = false
  #kms_key_arn    = module.kms.key_arn

  performance_mode = "generalPurpose"
  throughput_mode  = "bursting"

  lifecycle_policy = {
    transition_to_ia                    = "AFTER_30_DAYS"
    transition_to_primary_storage_class = "AFTER_1_ACCESS"
  }

  # File system policy
  attach_policy                      = true
  bypass_policy_lockout_safety_check = false # for KMS key management

  deny_nonsecure_transport = false # Allow non encrypted traffic for testing

  policy_statements = [
    {
      sid     = "Example"
      actions = ["elasticfilesystem:*"]
      principals = [
        {
          type        = "AWS"
          identifiers = ["*"]
        }
      ]
    }
  ]
  # Replace "*" with [module.ecs_service.tasks_iam_role_arn]

  # Mount targets / security group
  mount_targets              = { for k, v in zipmap(local.azs, module.vpc.private_subnets) : k => { subnet_id = v } }
  security_group_description = "Example EFS security group"
  security_group_vpc_id      = module.vpc.vpc_id
  security_group_rules = {
    vpc = {
      # Relying on the defaults provided for EFS/NFS (2049/TCP + ingress)
      description = "NFS ingress from VPC private subnets"
      cidr_blocks = module.vpc.private_subnets_cidr_blocks
    }
  }

  # Access point(s)
  access_points = {
    posix = { # Used for strict security controls and user isolation
      name = "posix-example"
      posix_user = {
        gid            = 1001
        uid            = 1001
        secondary_gids = [1002]
      }

      tags = {
        Additional = "Wordpress EFS"
      }
    }
    root = { # Default
      root_directory = {
        path = "/"
        creation_info = {
          owner_gid   = 0 # Non-root user is 1001. (as defined in dockerfile) root is 0
          owner_uid   = 0 # Non-root user is 1001. (as defined in dockerfile) root is 0
          permissions = "755"
        }
      }
    }
  }
}
When our container can mount and read/write with our EFS filesystem, the volumes from its perspective looks like this. 8 exabytes, tells us about the potential scalability of this service (also warns us of reasons it could get out hand and need monitoring)

ACM
# Obtain SSL certificate
module "acm" {
  source  = "terraform-aws-modules/acm/aws"
  version = "~> 5.0.1"

  domain_name            = "wp.tbalza.net"
  validation_method      = "DNS"
  wait_for_validation    = false
  create_route53_records = false

  tags = {
    Name = "wp.tbalza.net"
  }
}
Configuring TLS is deceptively simple in this setup. We don’t need Route53 at all, since our namecheap.com registrar points to Cloudflare NS records, which can be managed via API tokens that later define our CNAME records. We simply generate the certificate with AWS with DNS verification and pass that on to our next module.
DNS
# Validate ACM SSL certificate. Uses the output of acm module to to complete DNS validation in CloudFlare
variable "validation_record_keys" {
  type    = list(string)
  default = ["record1", "record2", "record3", "record4"] # Adjust based on the number of expected ACM validation records
}

locals { # The output is a map within a single list item, iterate through to define values
  acm_validation_records = {
    for idx, val in module.acm.acm_certificate_domain_validation_options :
    "record${idx + 1}" => {
      name  = val.resource_record_name  # Will appear as unresolved ref before apply
      value = val.resource_record_value # Will appear as unresolved ref before apply
    }
  }
}

resource "cloudflare_record" "acm_validation" {
  for_each = local.acm_validation_records

  zone_id = var.cloudflare_zone_id
  name    = each.value.name # Will appear as unresolved ref before apply
  type    = "CNAME"
  value   = each.value.value # Will appear as unresolved ref before apply
  ttl     = 1
  proxied = false
}

# Create wp. subdomain for ALB. Update DNS (managed by CloudFlare) CNAME to point wp.tbalza.net to ALB
provider "cloudflare" {
  api_token = var.cloudflare_api_token # Ensure you have this variable in your variables.tf or passed in via environment variables
}
resource "cloudflare_record" "wp_cname" {
  zone_id = var.cloudflare_zone_id # Ensure you have this variable in your variables.tf or passed in via environment variables
  name    = "wp"
  value   = module.alb.dns_name
  type    = "CNAME"
  proxied = false
}
Our nanecheap.com domain tbalza.net (which is hosted by GitHub pages, as per the first blog post) was changed to Cloudflare DNS management, by pointed to their NS records.
With our Cloudflare API token, we can take the output of module.acm.acm_certificate_domain_validation_options that generates a map within a list and with TF convert this output, to call for the change of the CNAME wp. to be that which is dynamically generated by AWS.
Secrets Manager
data "aws_caller_identity" "current" {}

# Allow ECS tasks to access secrets
resource "aws_iam_policy" "secrets_manager_access" {
  name        = "ecs-secrets-manager-access"
  description = "Allows ECS tasks to access secrets in Secrets Manager"

  policy = jsonencode({
    Version = "2012-10-17",
    Statement = [
      {
        Action = [
          "secretsmanager:GetSecretValue",
          "secretsmanager:DescribeSecret"
        ],
        Effect   = "Allow",
        Resource = "*" # It's better to specify exact ARNs of secrets
      }
    ]
  })
}

# Generate wordpress db password
data "aws_secretsmanager_secret_version" "secret_db_password" { # required to return the actual pw string for the RDS module
  secret_id  = module.secret_db_password.secret_id
  depends_on = [module.secret_db_password]
}

module "secret_db_password" {
  source  = "terraform-aws-modules/secrets-manager/aws"
  version = "~> 1.1.2"

  name_prefix = "wordpress-db-password-"
  description = "Secret for WordPress Database Password"

  create_random_password           = true
  random_password_length           = 41  # RDS length limit
  random_password_override_special = "_" # list of permitted special characters

}

# Generate wordpress user password
data "aws_secretsmanager_secret_version" "secret_user_password" {
  secret_id  = module.secret_user_password.secret_id
  depends_on = [module.secret_user_password]
}

module "secret_user_password" {
  source  = "terraform-aws-modules/secrets-manager/aws"
  version = "~> 1.1.2"

  name_prefix = "wordpress-user-password-"
  description = "Secret for WordPress User Password"

  create_random_password           = true
  random_password_length           = 41  # RDS length limit
  random_password_override_special = "_" # list of permitted special characters
}
Conclusions
We’ve successfully set up a high-availability environment ensuring our application layer is both scalable and resilient. Additionally, by separating storage with EFS and database operations via RDS, we’ve ensured stronger, more isolated backups and enabled smoother rolling updates. This design keeps the user experience uninterrupted, significantly reducing downtime during updates.
Areas for Improvement
Autoscaling: Refine autoscaling by adjusting the desired_count based on real-time needs. This ensures our setup can dynamically allocate resources and ECS Tasks according to our Target Tracking Policy without resetting our capacity planning with each deployment.
Principle of Least Privilege: Tighten security by refining ARN/actions/resources to uphold the principle of least privilege, ensuring containers operate securely without root access.
CloudFront: Optimize our setup further, reducing load on our compute resources by serving static files from closer to the user by adding a caching layer with CloudFront.
CI/CD Integration: Integrate with CI/CD systems like Jenkins or CircleCI, using unique Git commit hashes to manage deployments. This ensures continuous integration and deployment for every change, maintaining a smooth and consistent update process.
Tagging Strategy: Ensure all resources are properly tagged to streamline billing and management.
Backup Procedures: Automate backup processes for RDS and EFS will be a priority to safeguard our data effectively.
Monitoring and Alerts: Implement monitoring solutions with tools like Grafana, coupled with SNS notifications, to stay ahead of scaling events and other significant system events.
Looking Ahead
While ECS has non-trivial cost advantages, and it’s simpler to set up, EKS allows for more granular control when using Kubernetes — and it might be better suited for more established operations. Check out our Zero-Touch Provisioning & Deployment of Kubernetes CI/CD Pipeline article to see a working Proof of Concept that covers more advanced topics on this subject.